Get started

Install Axcess and run your first scan

Install the desktop app, run a small scan of a public site, then try a site behind a sign-in. If you are not a developer, the desktop app is the path for you.

Step 1

Choose how to install

Desktop app (recommended)

One app that bundles everything: the workbench, the browser, both rule engines, and text recognition. No Python, Node, or other developer tools needed.

  • macOS on Apple Silicon (M1 and later), Windows 10 or 11 (64-bit), and 64-bit Linux from 2022 on (for example Ubuntu 22.04, Debian 12 or Fedora 36, or newer)
  • A development preview, published automatically when the app changes
  • Free, with no account or sign-in needed to download

Download for macOS Download for Windows Download for Linux

The buttons always fetch the newest build. Release notes and earlier builds are on the releases page.

Read the installation steps below before you open the app. macOS and Windows show a warning on first launch that you need to approve, and on Linux you allow the file to run.
Run from source (technical)

For developers and IT staff on macOS, Linux, or Windows with WSL. Needs Python 3.11 or newer, uv, Node.js 22.22 or newer, and Tesseract.

# clone, then from the repo root:
make setup             # Python deps + Chromium
make migrate           # local database
make alfa-install      # optional second engine
make frontend-build    # build the interface
make run               # open http://127.0.0.1:8765/app/

Contributor setup, quality checks, and team hosting are in the contributing guide and the documentation.

Desktop app installation steps

The preview is not yet notarized by Apple or code-signed for Windows, so each system shows a warning the first time. The warning is expected for this build. You approve it once, and later launches open normally.

The drawings in the steps show where to look. A thick outline and the step number mark what to choose. The drawings are simplified, so your screen may look a little different.

On a Mac (Apple Silicon)

  1. Select Download for macOS and wait for Axcess-(version)-Mac-Apple-Silicon.dmg to finish downloading.
  2. Open the downloaded file, then drag Axcess into your Applications folder.
  3. Open Applications and double-click Axcess. macOS says it could not verify the app. Choose Done, not Move to Trash.
  4. Open System Settings, choose Privacy & Security, and scroll down to the Security section.
  5. Next to the message that Axcess was blocked, choose Open Anyway, then confirm with your Mac password or Touch ID.
  6. Choose Open in the final dialog. Axcess starts, and from now on it opens like any other app.

On macOS 14 (Sonoma) or earlier there is a shortcut: in Applications, right-click Axcess, choose Open, then choose Open again in the dialog.

On Windows 10 or 11

  1. Select Download for Windows and wait for Axcess-(version)-Windows-Installer.exe to finish downloading.
  2. If your browser says the file is not commonly downloaded, open the download's menu (the three dots) and choose Keep, then Keep anyway.
  3. Open the downloaded file. Windows shows a blue Windows protected your PC window.
  4. Choose More info. A Run anyway button appears; choose it.
  5. Setup asks who can use Axcess. Choose Only for me, then Next. This works without administrator permission. For Everyone who uses this computer, Windows asks for it.
  6. The next screen shows the folder Axcess will be installed in. Leave it, or choose Browse to pick another. Then choose Install.
  7. The last screen shows where Axcess is installed. Leave Open Axcess now checked and choose Finish.
  8. Next time, open Axcess from the Start menu.

If Run anyway does not appear, your computer is managed by your organization and blocks unsigned apps. Ask your IT support to allow it.

Without installing

For a computer where you cannot install programs, or to keep Axcess and its reports on a USB drive. Download the portable Windows zip (no install).

  1. Unzip it into a folder you can change, such as Documents. Do not use a network drive.
  2. Open Axcess.exe in that folder, and approve it as in the steps above.
  3. Axcess keeps your reports and settings in the Axcess data folder next to it. To move Axcess, move the whole folder.

On Linux

  1. Select Download for Linux and wait for Axcess-(version)-Linux.AppImage to finish downloading. It is the whole app in one file.
  2. Move it where you keep programs, such as a folder named Applications in your home folder.
  3. Allow it to run: open its Properties in your file manager and turn on Allow executing file as program. Or run chmod +x Axcess-*-Linux.AppImage in a terminal.
  4. Double-click it to open Axcess.

Ubuntu 23.10 and later do not let an AppImage use the browser sandbox that keeps web pages apart from the rest of your computer. There, Axcess opens with that sandbox off, so open only saved copies of sites you trust in the Page inspector. On other Linux systems it stays on.

Optional AI checks need a separately installed local service called Ollama and models you download yourself. Skip this at first: every browser-based check runs without it. How the optional AI stays local.

Step 2

Run a small first scan

Start with a public site you are authorized to test and a low page limit. You will get a report quickly and a feel for the tool.

  1. Select "New scan"

    It is at the top of the sidebar. The Public website tab is chosen first. Keep it.

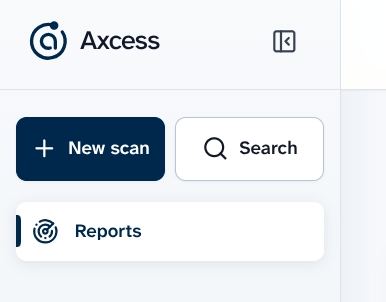
    The top of the Axcess sidebar. The dark blue New scan button, with a plus sign, is on the left, beside Search. Reports is below them.
  2. Enter the address of one section

    In Website address, enter something like https://www.example.edu/admissions/. The scan stays inside /admissions/. Leave Scan the whole website, under Pages to scan, turned off.

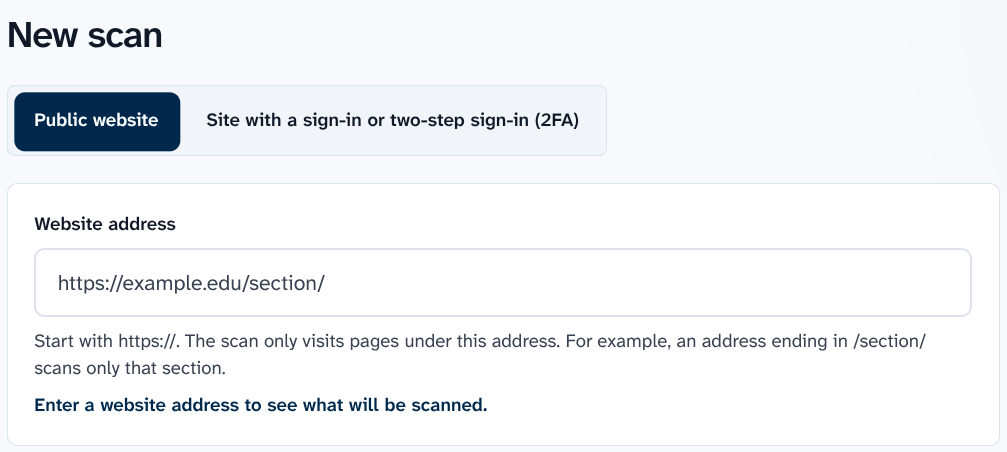
    The top of the New scan page. The Public website tab is chosen, beside the tab Site with a sign-in or two-step sign-in (2FA). Below the tabs is the Website address box, showing the example https://example.edu/section/ in grey.
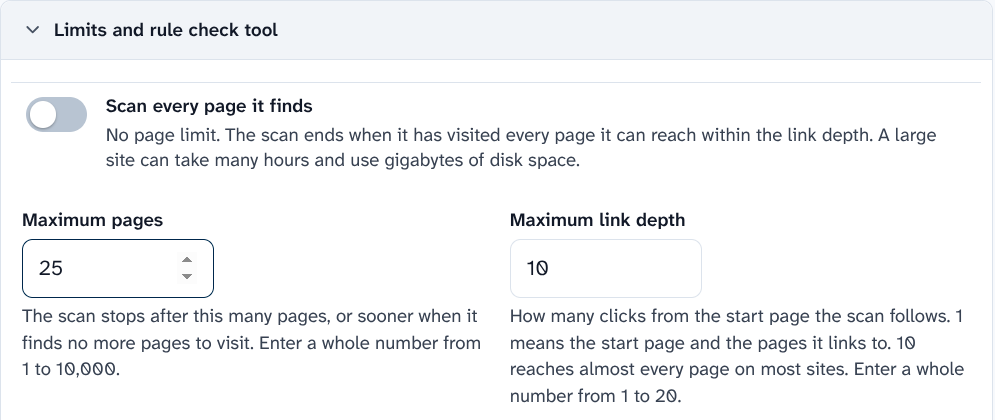
  3. Set "Maximum pages" to about 25

    Open Limits and rule check tool to find it. The other settings are fine as they are, and the browser-based checks need no AI. The What this scan will do panel lists exactly which checks will run.

    The Limits and rule check tool group, open. At the top, the Scan every page it finds switch is off. Below it, Maximum pages is set to 25, on the left, beside Maximum link depth.

    Want to watch it work? Turn on "Show the scanning browser window" under Speed and browser window.

  4. Start the scan

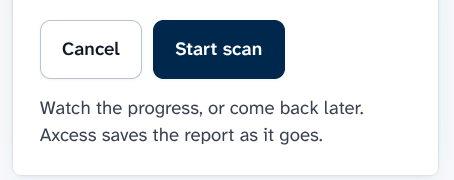
    Select Start scan. Progress updates as pages are found and tested, and you can select Stop scan at any time.

    The Cancel and Start scan buttons. Start scan is the dark blue button on the right. Below them: Watch the progress, or come back later. Axcess saves the report as it goes.
Step 3

Scan a site behind a sign-in

When you are comfortable, try a site that needs a login. You sign in yourself, so single sign-on and two-factor steps work, and Axcess never sees your password.

  1. Choose the sign-in tab

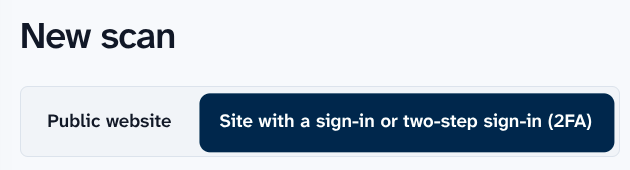
    Select New scan, then the Site with a sign-in or two-step sign-in (2FA) tab.

    The top of the New scan page. The second tab, Site with a sign-in or two-step sign-in (2FA), is chosen, beside the Public website tab.
  2. Enter where to start, and confirm you may scan

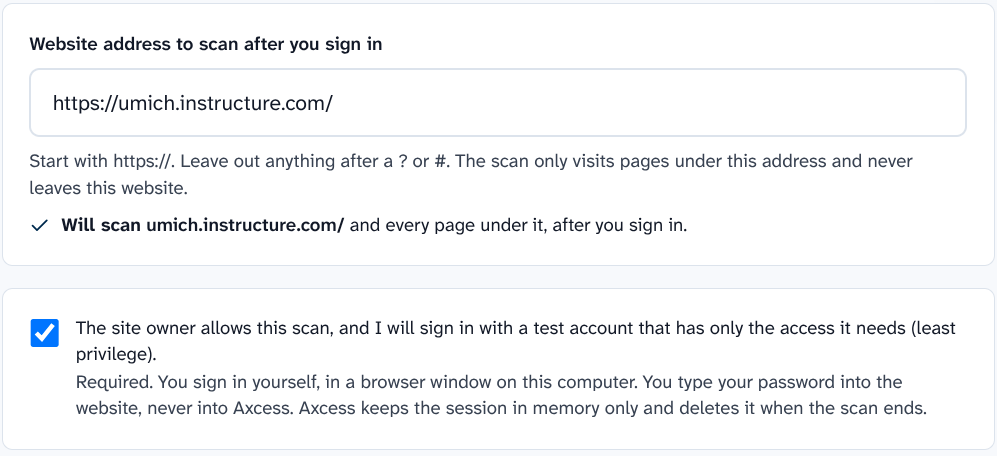
    In Website address to scan after you sign in, enter the HTTPS address of the page you want the scan to start from. Axcess shows which pages it will scan. Then check the box that says the site owner allows this scan and that you will sign in with a test account that has only the access it needs.

    The address https://umich.instructure.com/ in the box Website address to scan after you sign in. Below it, a check mark and the words: Will scan umich.instructure.com/ and every page under it, after you sign in. Below that, the box is checked that says the site owner allows this scan and you will sign in with a test account that has only the access it needs.
  3. Sign in in the browser window

    Select Open browser to sign in. A browser window opens at the site’s own sign-in page, which looks different for every organization. Sign in there as you usually do, including any two-step sign-in. If sign-in opens a new tab, finish in that tab. You are done when the browser shows the site itself, not a sign-in page.

  4. Start the scan

    Come back to Axcess. Under Finished signing in?, select I’m signed in, start scan. The scan starts from the page in the newest tab that is still open in the browser. If that page is outside the address you entered, the scan starts from that address instead. Either way, it stays inside the address you entered.

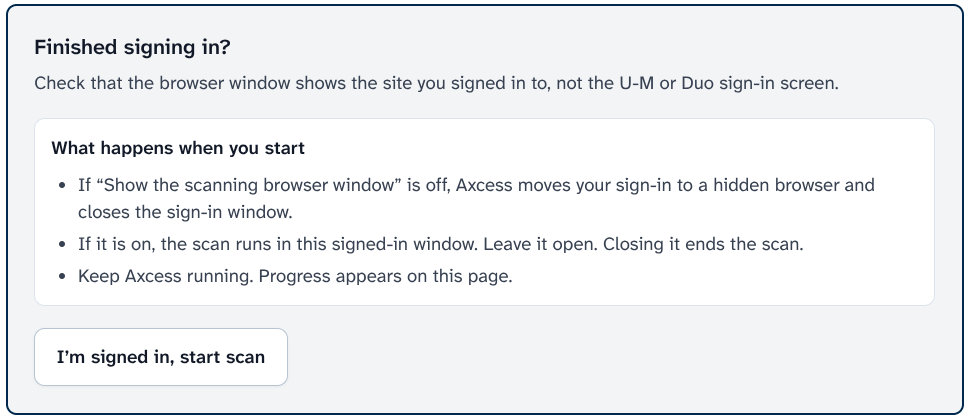
    The Finished signing in? box. It lists what happens when you start, and the button I’m signed in, start scan is at its bottom left.

What it needs

An HTTPS site whose address resolves to a public IP address. Sites on private network addresses cannot be scanned this way.

What is saved

Rendered pages and screenshots of what you signed in to are saved in the local report, unless you choose Don’t keep a saved copy of each page. No password or reusable login is saved.

What is different

Login scans do not check robots.txt. They can't run the AI language and motion checks. Image text checks are off unless you turn them on. If Axcess restarts during a scan, start a new login scan.

Step 4

Read your first report

Every result lands in one of three groups: Barrier, Needs review, or Informational. The glossary explains each one.

Start at the Issues tab

Issues are sorted with Barriers first, then by priority. Filter by Type or Level, and open an issue's title for its pages and its guidance.

Open the evidence

An issue's full evidence record shows the pages, the element, the code snippet, and screenshots. For problems found after a click, it names the control, for example "After clicking “Open menu”."

Check what actually ran

What this scan checked, above the Issues table, shows which methods ran and which did not, so you know what the scan covered before you draw conclusions.

Export and rescan

The Export menu offers an Excel workbook, an audit report, CSV, and JSON. After fixes land, scan again and use Compare reports to see what changed.

The full walkthrough, including every column and export, is in Reading your Axcess report.

Good to know

Before you scan

Authorization

Scan only the sites and accounts you have permission to test. If you choose to ignore robots.txt, that choice is saved with the scan. Axcess refuses to press controls named sign out, delete, or unsubscribe.

One scan at a time

Axcess runs one scan at a time. Start the next scan when the first one finishes.

Speed and coverage

By default, Axcess renders each page in a real browser and checks it several ways, so large scans take a while. On the New scan page, the Checks group lets you turn off individual checks when speed matters more.